Thursday, November 5, 2009

Book Launch


After much preparation, I took a trip to the old high school today for my long awaited book launch. It really has been an amazing experience getting this far. I only graduated from that school last year, so I saw many dear friends and teachers. Initially, I had the simple intention of stopping by the library and seeing if anyone was interested in a book. Once I mentioned the idea to one of the teachers, they wouldn’t have it! A great deal of the staff got behind me and insisted that this turn into a full scale book launch, and it certainly did. They contacted the local radio and newspaper, seeing if they could announce the event. I ended up going in for an interview with the paper and writing a small essay to the radio. Sure enough, they ran with it. Posters were put up in the school and I even merited the morning announcements. I was astonished to have been so powerfully supported by the community surrounding me, (one teacher in particular got the ball rolling). It would appear the idea of self-publication easily catches the eyes of the majority.

It would appear I don’t get out nearly enough, because showing my face in public yesterday and today actually got some response. Don’t take this as a sign of arrogance. I’m just not use to, “you’re that young man who was in the paper, aren’t you?” People actually knew who I was as I carried my box of books around (not that this wasn’t enough of a give away).

When I first got there, I only spoke to a few individuals, calmly waiting my turn in the library. Honestly, I was hoping to hear how live had been for others recently, instead of having them inquire about the book business. It comes to the point when I’m just sick of talking about books. Because I’m so rarely seen, people can only be sure that I have been working on my books. Not much else could be happening to me in my little office, hidden away from the world.

To begin the book launch, I was asked to do a reading before actually selling anything. I was expecting a solid…five people to show up. Wouldn’t you know it, I had a total of thirty, sitting and watching me read the prologue of my first novel. It was alien for me to be reading out loud like that, but I had undergone my share of practice, so it went well. I found trying to make a female voice overly difficult however. Being on the tail end of my teen years, my voice isn’t as flexible as it used to be. I was given applause, and I thanked the many people involved in making this little dream a reality.

Finally, I was able to start my sales, and start I did! Teachers and students came forward and offered me paper support (money) while I handed back paper labour (books). I sold upwards of thirty books, and not a single buyer would accept their copy without my signature. Any buyers that had forgotten initially, well, they hunted me down. Even the school library came and bought a few copies. That was the real kicker for me.

At the end of the day, after having visited a few classes and spoken to a few old friends, I returned to the library. I went to the librarian and asked if I could put my books on the shelf. She said I could, and ran to get her camera. She was one of my many friends at the school, and insisted that this moment was worth documenting.

Now keep in mind, I have nothing against the book series Twilight. I think if you enjoy the story and writing style, that’s your opinion alone. Still I felt the need to make the joke.

“I’m content as long as I’m not beside the Twilight series,” I jested, as we walked to the fiction section. I couldn’t understand why the librarian had suddenly burst into laugher upon the joke’s mentioning. It wasn’t that funny I thought…until I recalled the writer of Twilight had the last name Meyer, which turned out to be painfully close to Metcalfe. That’s right! I’m shelf buddies with Edward Cullen! And I’m not just near…I’m right beside. All well. At least people may notice my books now :)

Friday, October 30, 2009

SAMSUNG


I’ve run into some frustrating times when it comes to this printer model. As is true for the entire process of creating your own books, it’s a learning curve. Even though I understand this, it’s simply aggravating to think I had the printer beaten when I really didn’t. Allow be to describe my previous system. I had two toner cartridges, both I had emptied. Now these toner cartridges some with a chip that allows them to connect with the printer. This damned chip tells the printer how many pages it’s allowed to print. One of the cartridges mind you (the cartridge that came with the printer in the first place, called the “Starter cartridge”) doesn’t have a chip. Anyway, I use the starter cartridge until the printer says “Toner empty: Replace toner”. So, I bought the second one and ran it until I was given the same message. I found out however (being pleasantly surprised as well as angered) that if I simply click print again, it would continue printing. I was able to get an extra two copies out of each cartridge. So, this machine will insist that you get a new toner cartridge, despite there is still a few hundred pages worth still in the one it claims in empty. The lesson I learned being: The chips really don’t seem to have all that much power over anything. You click print, and it’ll continue until your pages come out faded. Defiantly keep an eye on what you’re printing once it claims to be empty. If you don’t catch it the moment it starts fading, you’ll waste paper. The other lesson was the annoying one. SAMSUNG designed their machine to cut out earlier than needed. I know this could be for safety reasons when it comes to wasting paper, but read on. It gets better.

The first time I contacted by toner-refilling people, they said that SAMSUNG couldn’t be refilled because of those chips. I told them that they continued to print if I ordered it to. As an experiment for both my toner buddies and myself, they refilled it for free and let me give it a try. I put the cartridge back into the printer and waited for it to ‘warm up’. Once it was ready it flashed the following warning: “Toner empty: Replace toner”. Wouldn’t you know it, I click print and my books come shooting out. It’s a bloody miracle! Despite the fact the cartridge was full, the machine still wanted me to replace it. Those chips weren’t designed to inform you when the cartridge was empty. They were designed so those cartridges could only give you 2,500 pages worth. SAMSUNG doesn’t want those things refilled. This way you keep buying. Now keep in mind all of this information is coming from my bias, and was not passed into me from a SAMSUNG professional. So as you should with all opinions, take my words with plenty of salt. But don’t discount me yet. There’s more!

First you need a bit of back information. There are two types of SAMSUNG toner cartridge for my specific model. There is the small and the large. The small costs $89 and gives 2,500 pages worth of toner. The large is $139 and gives 5,000 pages worth. Note that the physical difference between the small and large cartridges is almost non-existent. Quite literally, there is an open space in the ‘smalls’ where a second toner tube could be added. Then whamo!, you have a large one. This is where the back store ends. Now back to the bias.

No matter where you shop, and I mean no matter where (unless you were standing in the SAMSUNG manufacturing plant), you will not be able to find the large toner cartridges for sale. I checked Basic, Holst, and Staples. They only carry the small ones. The larger ones can only be gotten if you order them in. Instantly I think of marketing advantages and it comes to me pretty easily what SAMSUNG’s up to. By making the larger toner cartridges very difficult to get, they are increasing the amount of people buying the smaller ones. If you buy a smaller one, you will be needing toner far sooner, and you will have paid much more than needed. Let’s do some math again. In order to get 5,000 pages worth of toner using small cartridges, you will need to buy two of them, which is $178. This is what I (and I’m sure many others) were forced to do. Where as if we had the option of buying a single large one, you could get 5,000 pages worth for $139. So, let’s assume we’re SAMSUNG for a second, and we look at our statistical gains. What do you know, we make more money if we only have the smaller cartridges in stores, and have the large ones on order.

Now if the last bunch of information wasn’t enough to convince you that they are doing this all on purpose, then let me show you a real humdinger. I brought my small cartridge into my toner re-fillers and asked if they could simply slip in another toner tube and make it a large cartridge. I require a visual aid to explain why they couldn’t.


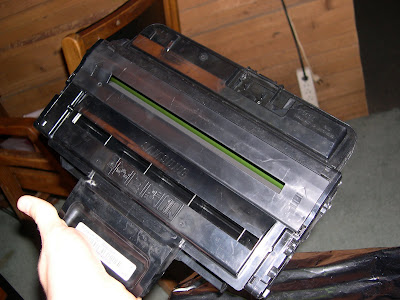
You see those depressions in the plastic right beneath where it says ‘SAMSUNG’ and above where all those little safety symbols are? Those are called trenches. What SAMSUNG has done is make those trenches so that the space below it is filled (meaning nothing else came be put there). Can you guess what that space was used for? That’s right. It was for the extra toner tube. SAMSUNG made those trenches so that these cartridges couldn’t be upgraded, and therefore, re-filled for dirt-cheap.

Now I’m not trying to sound cynical, but I’ve been working with this stuff for a while, dealing with it’s bull%$#@ for two months now. Maybe in my mind I’m trying to find a reason to hate SAMSUNG, but regardless, these descriptions of their technology are true. I only typing it up to be informative. But guess what! It’s not over!

As I’ve explained before, I have been re-filling my own toner cartridges because it’s considerable cheaper. With two home, refilled cartridges, I began printing. Usually I could get 15 copies out of each. When the first cartridge reached it’s tenth copy, it stopped. Instead of saying, “Toner empty: Replace toner”, It switched to “Toner exhausted”. I tried clicking print again as I always do, but it just wouldn’t do it. Not that the pages I was printing hadn’t started to fade yet, so I know there is still toner in there. (This is the cartridge without a chip). Now as far as I can tell, there is no identifying electronic material on that cartridge, so how in all hell could my printer recognize it and reject it (After it had been working through two different re-fills already)? Someone I know and trust said that if the cartridge were re-filled again, he believes it will continue printing. I have no idea how, but I’m willing to give it a shot. Immediately after this, I put in the other cartridge and started printing. The books started fading after only ten!!! It should have lasted for much longer. I was later informed that if a green drum within the cartridge is exposed to light for too long, it wares out. This drum is mean to create a negative charge and catch the toner during the printing process (or some crap like that). I had it sitting out for days on end without knowing this. Because of this, my toner was going to a spot in the cartridge for waste toner (note on waste toner at the end of article).

So, I can easily replace the drum, but first I have to buy it (along with more toner). As for my cartridge that has suddenly stopped working because it was designed to get me buying replacements (or so I believe) I have still not found a way around it. Like mentioned, it’s a learning curve, and one I intend to graph (math joke…sorry). One thing I can promise you, I’m not buying another toner cartridge unless it’s my absolute last option (mainly because I have no money!)


Waste Toner: There is a little compartment in each cartridge where all the waste toner is stored. You know what the difference between toner and waste toner? Nothing! Not that I’ve been able to determine anyway. It simply wasn’t used, and the cartridge had to store the particles it didn’t catch and use. So, when you open a toner cartridge, do it above something that is clean and ready to catch falling toner (it more or less pores out). I’m more than confident that it can be re-used. If you would sooner play it safe, wait a week and let me try.

Thursday, October 29, 2009

Formatting


I’m sure there are countless ways to do this on countless programs, which is the leading problem for me right now. To explain how I do it may limit you to the one way that has worked for me. So, I will make an effort to be as general as I can. Also understand that I am a die-hard loyal user of the 1997 version of Microsoft Word. Trust me, I have had plenty of opportunities to update, and even have far more expensive programs (i.e. Open Office) but I don’t use them. To date, I haven’t found a single feature any of them have that my 1997 version doesn’t. The only difference is the user-friendliness. In that regard, my program wins by a bloody mile. If the following information is of no use to you, then e-mail me with your problem. Maybe I could think of something.

To start, you must find the ‘printing properties’ for your program. They may be hiding in ‘File’ somewhere. If they are not there, you can simply click print and it’ll bring up the printing options menu. “Properties” should be right next to the printer model you’re using. Assuming you have a double-sided printer (duplex), you should be able to find the setting ‘Layout options’ or ‘Layout type’. Search through their options until you find ‘Booklet printing’. It’ll print the entire book in this beautiful fashion. On the front page it will print the first and last page side by side. Flip the page over and you’ll find the second and second-last pages there. Once printing is complete, take out the pages, and fold them over. You’ll find the book is in perfect order from first to last page. At this point, you will simply use your paper cutter to cut the two halves from each other. Afterwards, you can start binding. But don’t click print just yet. There is more to this.

When in this printing mode, the printer will automatically scale down your document. Meaning, if you were to print a word document (in the booklet printing mode) your words would be so small they couldn’t be red. This is why you have to scale everything up to compensate. What I do is: change my words to font 18 (times new roman), Extend my vertical margins as far as I can, and (believe it or not) make my horizontal margins smaller. This is because (after you cut the pages) you will need the room. You don’t want any readers to be prying their book open too violently just to see the words.

A trick I learned to get around the last mentioned problem involves mirror margins. It is when you move all the text “over”. You move it away from what will become the spine of your book. This, if you’re visualizing it right, should be impossible. If you move the margins to the right, let’s say, then the text on page one will be away from the spine as you planned. However, consider that the text on page two will have moved towards the spin by the same amount. This is why you must find ‘page setup’ which should also be hiding under ‘File’. My program will no doubt be somewhat different, but not by much. What you are looking for is a checkbox labelled ‘mirror margins’. It should be in the ‘margins’ section (who would have guessed). The small diagram of the page in this section should be replaced with two instead of one (once you check the mirror margin option). Now you can play with the setting (which should be just above the ‘mirror margins’ option). As you can see, whatever you change on page one, will be done to the same degree to page two, except in the opposite direction. This way you can move the text away from the spine with no trouble. Page one and three will have the same margins, while pages two and four have different ones.

Now for the finishing touches. You will need a page number and a header (if you so choose). For the page number, simply go to ‘Insert’ and click on ‘page numbers’. It will give you an option as to the position of the numbers. I would recommend having it in the top or bottom centre. Having it in the right or left corners leaves you with the problem of having it too close to the spine on every other page. If you want a header, then by all means have it. If you don’t know what a header is, open any book and look at the words on the very top of the page. They will often say the book’s title, and the author’s name. It’s a formality really, but one I’ve chosen not to go without. Anyway, go to ‘View’ and click on ‘header and footer’. It’ll open text boxes on the top and bottom on each page. Put what you’d like, but remember, you can have fun with it. Seeing as you don’t have to worry about the ‘professional’ advice from some hired editor, this book is truly in your hands. For example, I put the name of my book and my own name as my header, but I put in ‘symbols’ font, so it looks something like this.

Enyalius Metcalfe A People’s sickness

Why the hell not? Look through books that you think have interesting formats and maybe adopt a few ideas. Something I would recommend is starting chapters on a new page every time. As mentioned before, there are many different ways to format, so take the time to truly understand your program, and have some fun. You can make it a unique creation and still have it be appealing. Yet one of the many perks of self-publication.

Cover page


Designing a cover page is the fun part, and by far the easy part. Finding the proper material to print your art onto, now that’s a very different story. Originally, I used something called ‘cover stock’. It’s something you can find at your local Basics or Staples. It’s just 67-pound paper really. It only comes in 8.5 by 11 however, so it’s useable sizes are very limited. Not only that, but it was very sensitive to water. So, you end up with a very easily damaged book. I had to get more creative with later copies.

I moved immediately from this ‘cover stock’ to what I use today. At first I thought it was simple Bristol board. I was able to get it at Staples for $1.89 a sheet (that’s enough for four book covers). It had the colour gold on one side, and silver on the other. Its caption was ‘Two Cool Colours!’ This is where my old Brother printer came into the picture. It could do coloured images, so I printed out all my covers on this double coloured material. With a gold or silver background, the pictures had to look good. It wasn’t until I tried using different types of Bristol board did I realize how lucky I had gotten. I found that because of a thin layer of coating on most Bristol board, neither ink nor toner could produce a decent picture. This doubt coloured board was somehow unique in that it allowed the ink to saturate it. With any other material, I could wipe the ink off immediately after printing.

Though the double coloured board has been working fine, I’m soon going to try other types. The best covers I’ve been able to make thus far has been using watercolour paper. The ink works wonders on it, and allows the final product to be usefully flexible. The only reason I don’t make every book of the watercolour paper is because of cost, yet again. If cost weren’t such a factor, my books would look awesome!

Paper cutters


Unless you intend to create a book that is 8.5 by 11 inches, then a paper cutter is a necessity. Something rather tricky about cutting your paper is the fact that your document on the computer has to be properly formatted to match the size your going for (formatting will be covered in a later post). What I do is simply cut my pages clean in half, and format everything accordingly. Now the specific type of paper cutter you are using is crucial. I learned all the following information the hard way. As with printers, there are only two types of cutters I concern myself with.

First is the scissor cutter, consisting of one blade that can be pulled up and down in an obvious motion.


This device often comes with some kind of safety guard attached just over the cutting edge. “In all honesty, it’s a useless and aggravating safety precaution. It limits the amount of paper you can feed into it at a time.” Now this was my thinking, to the letter, when I first got my hands on one of these things. Wouldn’t you know it, that guard was there partially so you knew how many pages could be cut at once. In fact, it allowed more room than it shouldn’t have. I nearly destroyed the device by trying to cut upwards of thirty sheets of paper in one go. When it comes to making books, you can’t expect to cut a single copy in three or four different cuts. It wouldn’t come out even. The scissor cutter is no good for cutting a book in half after printing. I use it to make cover pages only. So, I was forced to upgrade.

The guillotine paper cutter, my personal favourite, brings the titanic blade down, thanks to the help of a leaver, easily cutting through 500 sheets of helpless paper.


Not only does it have a marker to allow the perfect measurement, but also it has a clamp to hold the paper in place. It does the job, and with little to no problems. However, finding the one right for you can be difficult.

When I first realized I was going to need a paper cutter, I started throwing phone calls everywhere. You would think the things easy to fine, but that was not the case. Even Staples didn’t have any in stock. Now when I mean paper cutter, I mean the guillotine cutter. Having a scissor cutter is just a luxury. (Mine was listed for $50. I snatched her for $20.) Anyway, my beautiful paper cutter cost me $180, not counting tax. I think it was over priced, but it’s proving its worth. I had to drive to Toronto to get the damned thing (for me, a three hour drive). It was from a small business called All Image Printing (AIP).

http://www.allimageprinting.com/

Like I said, overpriced I thought. If you are going to go to them, be wary. I’m not saying they weren’t nice enough. Just understand that they are running a business, and their goal is to sell a product. When there, they tried selling me a ‘cover folder’ (something easily done with two rulers) and a ‘book-binding machine’. Remember those glorified glue-guns I mentioned earlier? This thing personified just that. I don’t think it would have done that good of a job, the guy selling it had never used it, and it was $360! I could create fifty binding contraptions for that kind of money, as could you. (Trust me, your going to need the money for toner.) So, my final tips are simple. Take your time and find a good guillotine paper cutter for as cheap as you can. If you can get a scissor cutter for dirt cheap, then it may be worth the convenience. I leave it to your judgement

Wednesday, October 28, 2009

Paper


In order of cost, paper is the second most expensive material needed, right after toner. Now there are a series of arguments and preferences that go into the paper you want. In the end, it comes down to how much money you want to spend. I will start by offering the opinion of book printing professional, and then add my own opinion on the topic. There are two main details.

First, it is recommended that book pages be off-white. This apparently gives the book higher aesthetic value, and is rumoured to be easier on the eyes. They argue that having the contrast of black text on white paper is difficult to look at. I never really noticed much difference, but I suppose the logic is sound. My opinion says otherwise. People read text from plain white paper all the time. I believe off-white paper to be an unnecessary luxury. Yet no matter what published book you look at, the pages will be off-white, so maybe the majority of people disagree.

Second, they say the pages should be decently thick. Now I doubt all books follow this rule anyway. It is apparently so you cannot see the words on the other side of the pages. I have never seen this to be a problem. Now if you insist on having these two appeals when choosing your book’s paper, then what you are looking for is something called ‘book stock’. If there are any local printing places, give them a call and see if they have it. Rest assured, they will sell it to you. Yet, read on to my argument against doing this before making a decision.

Like I mentioned earlier, paper is the second most costly material. When I first started printing books, I used cream paper. It was a good colour, and reasonably cheap. Though as time went on, I needed to start buying materials in bulk. This is the math. For 5,000 sheets of cream paper, roughly $70. For 5,000 sheets of book stock, roughly $85 (from the printing place I called). For 5,000 of plain twenty pound white paper, $44. In case you didn’t catch the heavy implication, yes, I use plain white paper. I get it at 92 brightness, which is the darkest I could find. Trust me, it works perfectly fine (professional printers are probably shouting blasphemy by now). If you would like some re-assurance, pick up…any modern copy of the bible, really. You will find that using plain white paper will be darker and thicker than the pages in that bible.

There is an interesting fact that goes alone with using plain white paper. If you took my recommendation of lowering the darkness level of toner you use (mentioned in an easier post) then the contrast of black and white isn’t nearly as hard on the eyes. Just like that, your paper costs are half that of printing companies!

Tuesday, October 27, 2009

Binding


Binding a book was by far the most difficult process to learn, but now that I understand it to the letter, I wonder why it hadn’t come naturally. My first few attempts were horrid, as I’m sure they will be for any beginner. Keep in mind that I will be talking about ‘perfect binding’ only. There are many others you could try (such as ‘saddle stitched’ or ‘staple bindings’) but I can offer little advice on those, and I believe them to be a little too complicated. If you manage it, let me know.

Now that I’ve already worked out the needed materials, it should be a simple matter of practice for anyone who would like to give it a shot. The first thing that is needed is a contraption to hold the book in place. I started with a single board, and attached another at the bottom to form a base. Once in place, I set a sample of my book on the base (standing on its side). Screw two smaller boards on each side of the book that will keep it straight. Finally, you need another board that will attach to the two boards keeping the book in place. Once this is attached, the book itself should be covered and held in place. I understand that these instructions must be hard to visualize, so I will attach pictures somehow. You may be able to design a better contraption than myself, and I encourage you to improve on the idea. Still, what you should have as a finished product is something that will hold your book in place and expose the side you want to glue upwards.


This is where another piece of equipment comes in handy. You will need a glue-gun of sufficient power. I say that in all seriousness. I started off by using a 26W glue-gun, and it did the job well enough. Still, some pages started to fall out after time, and I was informed that the glue needed to be hotter. When hotter, the glue will stay liquid longer, and will have a better chance to saturate the pages. Now I use an 80W glue-gun, and I haven’t seem a page fall out yet. (Note: Do not try heating the glue in a pan and then brush it on. The glue will ignite.) Take your glue-gun and begin brushing the pages with the very tip, while at the same time apply the glue. You rustling the pages will allow the glue to get between them somewhat. Continue until the book’s side is covered. As time goes on, you will become more and more proficient, and you will learn to use less and less glue each time.

Now that one side of your book is held together by glue, you will want to smoothen it out to allow the cover’s attachment to go easier. What I started doing was putting the tip of a metal wedge in a torch flame until it was red-hot. I then ran it across my glued book. The glue smoothens easily. You will probably see some glue run over the sides. What I usually do it carefully use my heated metal wedge and smoothen the extra glue against the pages its dripping on. I have a heat-gun now, and it is an incredible asset. Don’t just leave the glue in droplets, or getting the cover of will be difficult. Once satisfied with your gluing job, take the book out of you contraption and observe. You should be able to pick out what needs improvement. Once you’ve fashioned a cover (covers will be described in a later entry) it’s a simple matter of putting a line of glue on the book’s spin and quickly applying the cover in the proper position.

As mentioned, this is the part of the job that requires time and practice. I can now look at the spines on my books and know how long ago they were made, simply by the quality. Don’t let this process scare you. I’ve watched some video of book production, and at the end of every assembly line is some person, taking the book and attaching the cover. They use a glorified glue-gun, and some small machine to hold the book in place. What I’ve been able to do is no different, just slightly simpler.